
Many people do not realise that they are experiencing heat loss in their homes. Heat loss in your home can make it harder to stay comfortable during colder months, reduces efficiency, and also drives up energy bills.
Identifying areas where heat escapes can make all the difference and help you take action to create a more energy-efficient home which retains more heat.
Here’s a step-by-step guide on how to identify heat loss in your home.
Please note...
Before you look for causes of heat loss in your home, make sure to rule out other potential causes for your home feeling colder. Check that your boiler is not faulty or in need of replacement, and assess whether your current heating system is efficient for your home.
How to Identify Heat Loss in Your Home
Step 1: Familiarise Yourself with the Main Culprits of Heat Loss
Before you go searching for heat loss in your home, it’s helpful to know about the common culprits:
- Walls and Roof: Absence of insulation, or inadequate insulation, in walls and roofs can lead to significant heat loss in your home.
- Windows and Doors: Windows and door draughts or single glazing can allow the warm air to escape.
Floors: Uninsulated floors, especially in older homes, can let heat escape. - Chimneys and Vents: Open or poorly sealed chimneys that are no longer in use and vents are easily overlooked but can cause considerable heat loss in your home.
- Gaps and Cracks: Small cracks around windows, doors, and skirting boards can all add up to considerable energy losses.

Image via @TheOtherKev / Pixabay
Step 2: Conduct a Visual Check
Start by walking through your home and looking for visible signs of heat loss, such as:
- Condensation: Look out for window moisture that could be caused by insufficient insulation or air leaks.
- Gaps and Cracks: Check for gaps under doors, windows, electrical outlets, and pipes.
- Draughts: Hold your hand near the edges of your windows and doors see if you can feel any air movement.
- Rule out other reasons why your home may be colder: Make sure you rule out other issues, aside from heat loss, that may be making your house colder such as a faulty or old boiler.

Image via @DerNaut / Pixabay
Step 3: Perform a DIY Heat Loss Test
You don’t need expensive equipment or tools to find heat loss in your home. Try these tricks:
- Candle or Incense Test: Light a candle or incense stick and hold it near windows, doors, and other potential draft sources. If the flame flickers or smoke zigzags, you have an air leak.
- Thermal Camera App: On some smart phones, you can download thermal imaging apps that can detect cold spots on walls and around windows.
- Use Your Senses: Next time there is a windy day, go around your house and search for draughts or cold spots.

Image via @AndyBaron / Pixabay
Step 4: Hire a Professional Energy Audit
To get a more thorough evaluation, think about hiring a professional to perform an energy audit. They can:
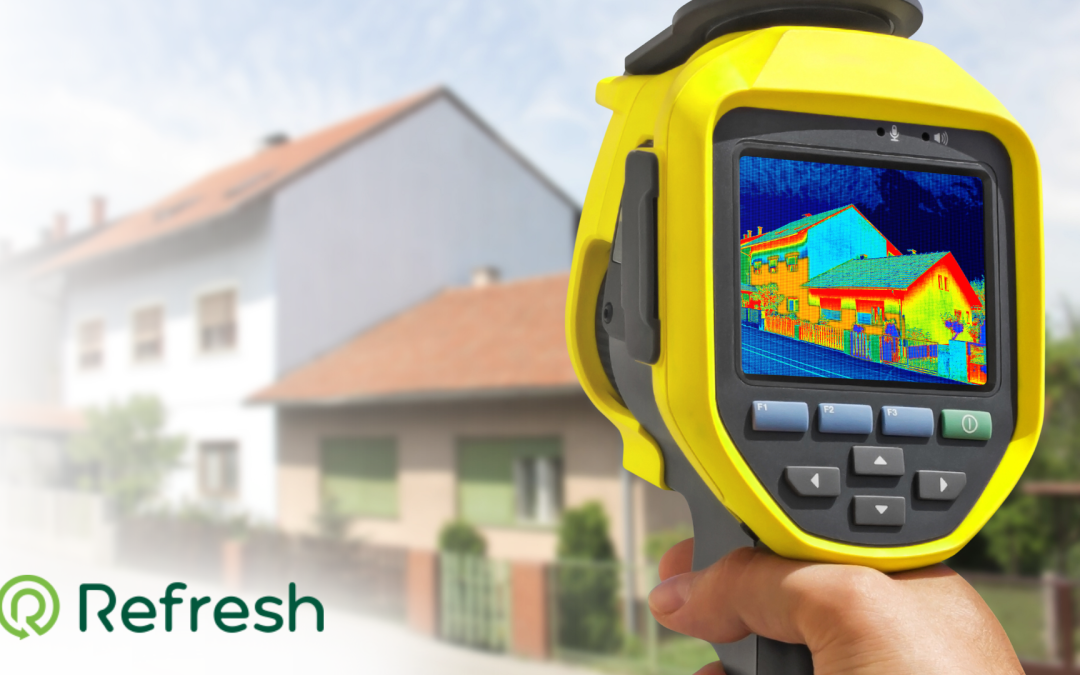
- Utilize specialized equipment, like infrared cameras and blower door tests, to identify problem areas and sources of heat loss.
- Provide a detailed report on your home’s energy efficiency and give your home an EPC (Energy Performance Certificate) Rating.
- Suggest and recommend customised solutions to tackle specific problems in your home.

Image Via @dariolavera / Canva Pro
Step 5: Address the Problem Areas
Once you’ve identified where heat is escaping, take steps to address the issues:
Improve Insulation:
- Add or upgrade insulation in your walls, roof, and floors. You can opt for Cavity Wall Insulation, Loft Insulation, Solid Wall Insulation, or a mix of the three to make sure your home stays as warm as possible.
- Use thermal curtains or blinds to improve window insulation and exclude draughts.
Seal Draughts:
- Apply weatherstripping around windows and doors.
- Use caulk to seal gaps and cracks.
Upgrade Windows and Doors:
- Consider replacing single-glazed windows with double or triple glazing.
- Install energy-efficient doors with better seals.
Chimney Solutions:
- Use a draught excluder or chimney balloon when the fireplace is not in use.
Seal Chimney Openings:
- If there are unused chimney openings in the house, seal them with chimney balloons or other draught excluders.

Step 6: Monitor and Maintain
Following the installation of solutions, monitor your home’s performance:
- Monitor your power bills to see if they have decreased at all.
- Check for draughts periodically, especially before winter.
- Schedule regular checks to maintain your home energy-efficiency.
All in all…
Identifying and fixing heat loss in your home is an essential step toward improving energy efficiency and comfort. No matter if you do it yourself or hire a contractor, solving these issues can lead to substantial savings on energy bills and a warmer, cosier home.
If heat loss is not the source of your home feeling colder, it may be time to replace your old gas boiler or upgrade your heating system from oil to gas. Even if your home is older, you can still have a new energy-efficient home heating system through a process called retrofitting.
Frequently Asked Questions (FAQ’s)
Why should I take measures to prevent heat loss?
You should take measures to reduce heat loss in your home to reduce your carbon emissions, keep your energy bills low, and make your home more energy-efficient.
Taking measures to reduce heat loss in your home is also a way to future-proof your house for the heating solutions of the future and the road to carbon zero (e.g. Heat Pumps can only be installed in a building with low heat loss).
How much heat loss in a house is normal?
According to Power To Switch, roughly 25% of the heat generated by your boiler is lost through your roof, while around 35% escapes through the walls and gaps around windows and doors. An additional 10% of the heat is lost through the floor.
How much does insulation reduce heat loss?
Insulation, depending on the type, can reduce heat loss by up to 45% according to the BBC.
Good Energy also asserts that installing insulation can save you hundreds of pounds per year, and that insulation can offset its cost through bill savings within 2 to 5 years, depending on the type installed.
Recent Comments